
Mintmark Varieties:
RPM Die Progressions
![]()
RPM DIE PROGRESSION THEORY
Die State
The average Lincoln cent die produces approximately one million coins. The coins struck at the end of the die's life are quite different in their quality than those struck at the beginning. One million strikes can produce a lot of wear and tear, even on a steel die. The life of a die can be described by the wear and tear it undergoes from its beginning to its end. There are two ways of describing die progressions. The first focuses on die wear. The description of the wear has been termed “die state” by Delma Romines, the developer of the theory. In his theory, a die proceeds from a Very Early Die State (VEDS) to a Very Late Die State (VLDS), with three additional states in between (Early Die State, Middle Die State, Late Die State). The die state is basically determined by the amount of die wear as seen in the metal flow lines which develop as a result of metal fatigue in the die itself. A VEDS coin has very sharp lettering and design features with no metal flow lines. These are the very first and the very best coins struck from a die. A VLDS coin has very harsh metal flow lines and generally has a “washed out” look to the lettering and design features. These are the very last and the very worst coins struck from a die.
Die Stage
The second way of describing die progressions focuses on die tear. The description of die tear has been termed “die stage.” This term has been in use for years and the name of the person who coined the term has unfortunately long been forgotten. The theory behind “die stage” progressions has seen several revisions through the years. The general theory begins like this: When a die is first placed into use, it is perfect, that is free from “tear.” Then as a die is used, it develops imperfections that grow steadily worse and worse until the die has to be pulled from the production line. These imperfections consist mainly of die clashes, die cracks, die chips, and die breaks. They may occur anywhere on the die but are most frequently found where the die receives the greatest stress.
Both descriptions of die progressions are necessary to fully describe a die's life. It is entirely possible and indeed highly probable that a die can proceed from VEDS to VLDS without any die tear. In such a case die state is of utmost importance to determine where in the die's life a particular coin should be placed. Likewise, under normal circumstances severe die tear indicates a late die state and thus a full production life for the die. However, severe die tear can occur early in a die's life. Without knowing the die state, the die stage gives the false impression that the die had a normal production life when if fact it was cut short. While this general die progression theory is accurate, there are several assumptions that must be considered before the theory is actually put into practice.
RPM Die Progression Assumptions
The Perfect Die
The first assumption is that of a perfect die. It is a well known fact that master dies and hubs have their own set of progressions. Take, for example, the 1936 Lincoln cents. One of the Working Hubs became chipped and the left leg of the R of LIBERTY is missing on many of the coins for that date. Another instance of this is the 1956 Lincoln cents where a small section of the lower 6 of the date is missing on many coins. A less common example can be seen on the last T of TRUST on some of the 1941 doubled die cents, where the left cross bar is missing. If these rather large defects can occur, even though only rarely, it seems only reasonable that more minor defects find their way onto the working dies before they ever strike a coin. This indeed is the case and thus a progression may begin not with a perfect coin, but with a defective coin (that is a coin with a VEDS but also showing die tear).
Die Pair Mating
The second assumption is that both the obverse and reverse dies are placed together in the press at the beginning of their die life. While this can and does happen, it simply is not standard operating procedure. The reverse dies average just over a million strikes each while the obverse dies average just under a million strikes each. When the obverse die wears out, it is replaced with a new die. The reverse die however, is left in place to strike as many as an additional 400,000 coins. Thus a progression may begin with a VEDS obverse and a VLDS reverse. Additionally, that VLDS reverse may show die tear. When the reverse die wears out, it is replaced with a new die. The obverse die is now in the middle of its die life. Carry this sequence through several times and it becomes apparent that more often than not the dies are paired together at different die states as well as at different die stages.
More Die Pair Mating
A third assumption is that when the dies are placed in the press after having been removed and abraded (new term for polished or sanded) they are matched together with their original mate. While this certainly can happen, it does not have to happen. In a quad press there are eight dies in four pairs. Thus there is a lot of room for movement between die pairs. While the dies need not be removed from the press every time they are abraded, they certainly can be and depending upon how often the dies are abraded, there could be several die pair combinations. Abrasion also contributes to several kinds of die markers. These are die scratches, die gouges, and other kinds of die damage.
The “Reverse” Progression
A fourth assumption states that once a die develops an imperfection, that imperfection remains on the die until it is retired from use. Superficial die cracks, especially those on new dies (VEDS), can “heal themselves” and disappear. As the die wears, the metal heats and melts these superficial cracks together. Thus a coin without the die crack is actually further along in the progression than a coin with the die crack. Die clashes can be abraded away. Likewise, they can also exhibit this “reverse” progression. Even heavy abrasion marks or grinder digs can be removed, leaving little if any trace of their previous existence (e.g. 1961-D 1c RPM-071).
The RPM Appearance
A fifth assumption, this one specifically regarding RPMs, claims that the strongest appearing RPM is the earliest stage. While this is true a majority of the time, there are quite a few times when just the opposite is the case. (The following material is an extract from chapter 3 of The RPM Book (First Edition). The referenced photos can be found there and below.) The specific coin that brought about the discovery of this phenomenon is the 1959-D RPM-001. Ever since Albert Kramer published his booklet on the doubled D cents, this variety has puzzled the experts. There is a progression of die stages in this variety causing the RPM to change greatly in appearance throughout the life of the die. Al Kramer, and Jean Cohen after him, listed the die stages so that the coin in photo #3 was the first stage, the one in photo #1 was the second stage, and the one in photo #2 was third.
|
|
|
|
| Photo # 1 | Photo # 2 | Photo # 3 |
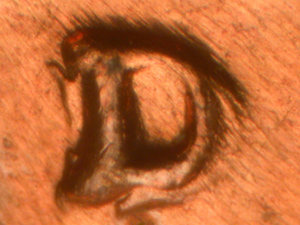

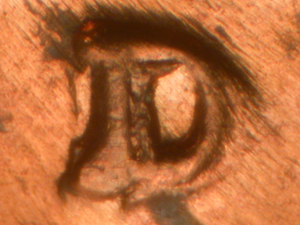
Their reasons for arranging the coins in that order were due to conventional RPM theory and some unfortunate timing by the U.S. Mint. First, by the theory they used, the coin in photo #3 had to be the first die stage since it had the strongest appearing RPM. They reasoned that as the die wore from striking thousands of coins, the RPM would gradually become less and less distinct until it reached the die stages represented by the coins in photos #1 and #2. In fact, this is the way most RPMs develop. Second, they looked at the reverses of each coin and found the reverse of the coin in photo #3 was perfect, while the coins in photos #1 and #2 usually had die chips around the Memorial Building. Conventional theory says that the coin in photo #3 is the earlier die stage.
However, there were questions not answered by arranging the die stages in this order. For example, how could the very strong vertical bar of the “D” to the East in the earlier die stage be obliterated by die wear while the similar vertical bar of the main “D” is not worn at all? This was a key question, but everyone ignored it, hoping the question would resolve itself because they had no answer. It was the new theory on the 1880/1879 Morgan Dollar overdates that led directly to the solution to the 1959-D RPM-001 progression.
Briefly, the theory by Leroy Van Allen was this: Some dollar dies dated 1879 were discovered to be unusable late in the year. Instead of scrapping some expensive dies, the engraver decided to try re-impressing the dates on those dies with an 1880 date logo. When the numbers 1 and 8 were re-impressed, there was little overlap. However, when the numerals 8 and 0 were pressed into the die settle, metal was caused to flow just as when a coin is struck. The easiest direction for the flow to run in this case was into the voids in the die that were created by the numerals 7 and 9. In most 1880/1879 varieties, the 79 was almost completely obscured by the metal flow.
This metal flow theory of the overdates is directly related to the RPM question. When this 1959 RPM was made, one “D” was punched into the die and then, when the “D” was repunched, metal was displaced into the cavity left by the first punching, leaving the surface appearance of the first “D” quite weak (see photo #1). However, this displacement from the second punch caused a phenomenon known as “cold working,” with the greatest degree of working concentrated at the boundaries of the two punches. Cold working hardens metal, but at the same time it makes it more brittle.
So, when the die was first put into use, the RPM appeared as in photo #1. As the die wore during use, chipping formed around the Memorial Building as seen in photo #4. Then at the brittle boundary between the two punches, the cyclical stresses of striking coins caused the metal displaced by the repunching to fail much earlier than elsewhere in the die and to chip out. The result made the mintmark appear as in photo #3.
|
|
|
Photo # 4 |
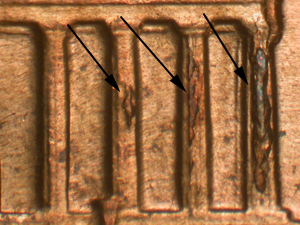
The cause of a lot of confusion was that before the metal in the mintmark area chipped out, the dies apparently were inspected and the chipping on the reverse was discovered. The reverse die was retired and a new one installed in the press. If the obverse die was inspected at the same time, the RPM was obviously not discovered as the obverse die remained in use. The timing of this inspection was just bad luck for Kramer and Cohen, as the replacement of the reverse die at that particular time was an important factor in the way they listed the die stages. (The sequence in The RPM Book (First Edition) is also inaccurate. See the correct sequence here.).
Incomplete Listings
One final assumption needs to be addressed. No matter how many coins one examines from a particular die progression, it is impossible to examine every coin in that progression. Progressions are built on the examination of a very small number of coins. Thus any progression listing will have huge numbers of coins between the various stages. Significant stages may even be missing. Exactly where the dividing line should occur between stages is also a matter of much debate and cannot finally be settled until large numbers of coins from any given progression can be examined. A word of advice about unlisted stages is helpful here. Just because a stage is unlisted does not mean it has additional value. It simply means that coins from that particular section of the die life have not yet been examined. On the other hand, some stages are rare (at least for the present) and should command higher premiums.
RPM Die Progression Practice
Up until now, the discussion has centered on die progression theory. It is now time to place to that theory into practice. But, where does one begin? The procedure is two-stepped. First, begin with the RPM itself. Check the RPM direction (North, South, East, West, Rotated, Tilted etc.). Compare this information to the RPM pictures to narrow down the scope of the search. Next begin a clockwise search around the obverse of the coin being careful to notice both the die state and then any die markers that could determine die stage. Repeat the search procedure for the reverse of the coin. Match the die markers against those listed for the RPMs in the narrowed scope. The vast majority of the time this will bring into focus only one RPM. For those few instances where markers are similar or lacking, check the mintmark position relative to the date both vertically and horizontally. By this time the RPM number should be firmly established.
The second step, determining the stage identification, is all that is left for an accurate RPM attribution. Match the die markers against the stage listings until a stage is found that matches the markers exactly. If the markers do not match exactly determine where in the progression the coin should be placed. Remember to use all the clues given in the die markers and the general outline of die progression theory as noted above.
RPM Die Progression Terminology
Two sets of terms need to be clarified. First are the terms describing die markers.
Die Clash - When the dies come together without a planchet between them, part of the design from each die is transferred to the opposing die. Coins struck by those dies will show the transfer of the design. The transferred design will show upside down and incuse on a struck coin. For the Wheat Cent look under Lincoln's chin for an upside down N of CENT on the obverse and between the E of ONE and the N of CENT for Lincoln's tie on the reverse. For the Memorial Cent look for the vertical columns of the Building both in front of and behind Lincoln's head as well as for the horizontal building lines through the 1 of the date. On the reverse look in the first 3 bays of the Building for an upside down RTY of LIBERTY. Also Lincoln's head can be seen through the letters of ONE CENT.
Die Scratches - These are raised thin lines usually on the fields of a struck coin (but may occasionally be seen on the design) which are created by the sanding or abrading of a die. It is the pattern of the die scratches which make them important for stage determination. The pattern acts like a fingerprint, pinpointing an exact position in the die progression.
Die Gouges - These are raised thick bulges usually on the fields of a struck coin (but may occasionally be seen on the design) which are created by the striking of a hard object against the die. This object could be another die, a hammer, or even a grinder.
Die Cracks - These are raised irregular lines found usually at the design stress points. Thus they may be on the design itself or on the fields. Usually they extend from the design onto the field. Since die cracks usually occur in the same general areas on every coin (as do also die chips, and die breaks), they cannot be used to absolutely fix a particular RPM. However, added to other die markers they serve to tilt the weight of the evidence in one direction or another.
Die Chips - These are small raised irregular blobs found usually at the design stress points. They are most often found in the recessed areas of certain letters or numbers (e.g. B & R of LIBERTY and the 9 & 5 of the Date). This is because the recessed areas of the letters and numbers on the coin are raised areas on the die, which look like little islands. It does not take much stress before these raised pieces of the die chip and break off, leaving a raised area on the coin where a recessed area is expected.
Die Breaks - These are large raised irregular blobs found usually at the design stress points. They are most often found in the fields between the design and the rim. After repeated strikings under tons of pressure the dies begin to crack. When these cracks meet each other (as in a circle) or when they extend to the rim, the metal contained within the borders of the crack begins to break away from the die itself. The broken piece may not at first be loose enough to fall away. In such a case the coin will show a depression where the die chip or if it is large enough the die break has occurred. If it is the anvil die, that is it is the die which is on the bottom (for Lincoln cents that is usually the reverse die) then the collar may hold it in place. The coins produced from such a broken die with show the portion of the die which has broken away as a raised area like a plateau. Such coins which have raised areas extending to the rim are called retained CUDs. Complete die breaks which extend to the rim are called CUDs.
Second are the terms describing the placement of those die markers. Refer to the following charts for a pictorial representation of the terms used to describe the placement of die markers on the Lincoln Cent.
Die Progression Listings
The die progression listings should normally be read from bottom to top. While this at first seems backwards, it will readily be seen that this is the fastest way of determining the die stage of a given RPM. This is because the listings provide only the new markers for a given stage. The markers showing up in previous stages are not repeated. By beginning at the bottom, each stage can be eliminated by matching that entry's description against the coin's die markers. When the markers match the description, then that is the RPM stage. Practice makes perfect. Thus, after a few matches, the procedure will become second nature.
| Home |
Introduction |
Design Changes |
Mintmark Styles |
Doubled Dies |
Mintmark Varieties |
RPDs and MPDs |
Die Errors |
| About CONECA |
About the Author |
Copyright James Wiles, 2011
Email: jameswiles@sbcglobal.net
1490 Trail View Lane
Frisco, TX 75034-2649